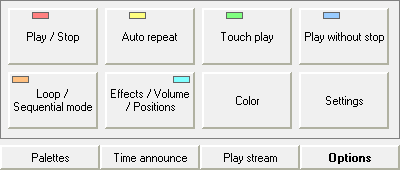
Options tab allows you to customize Jingle Palette the way you like.
Don't forget that any changes (volume, effects, color, play mode, assign or clear jingles) in a palette are memorized only on saving palette. A floppy icon will be displayed on each change, to bring you to save the palette to keep changes. Clicking on the floppy icon will directly save the loaded palette without asking palette's name, or will focus to the palette's name input field for the new palette.
Click on the play mode (Play / Stop, Autorepeat, Touch play and Play without stop) you want to assign to a jingle. All the assigned buttons on the palette will turn matching play mode color, so you can choose a jingle to set its play mode. To remind you about this play mode, a matching play mode color LED is lit up on the button. See Play to learn about play modes.
Right-clicking on a jingle button and selecting wanted play mode will do the same.
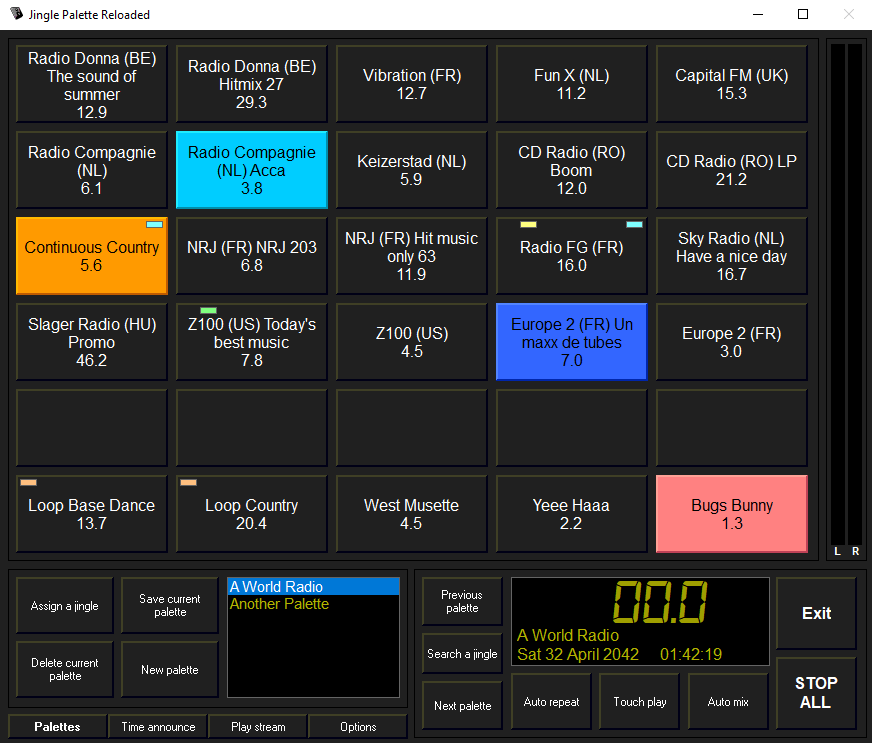
Each jingle can be played in loop, and this preference is also memorized in the palette on saving it. To do that, click the Loop / Sequential mode button. The button will change for Loop mode and all the assigned buttons on the palette will turn orange, allowing you to select a jingle to be played in loop mode:
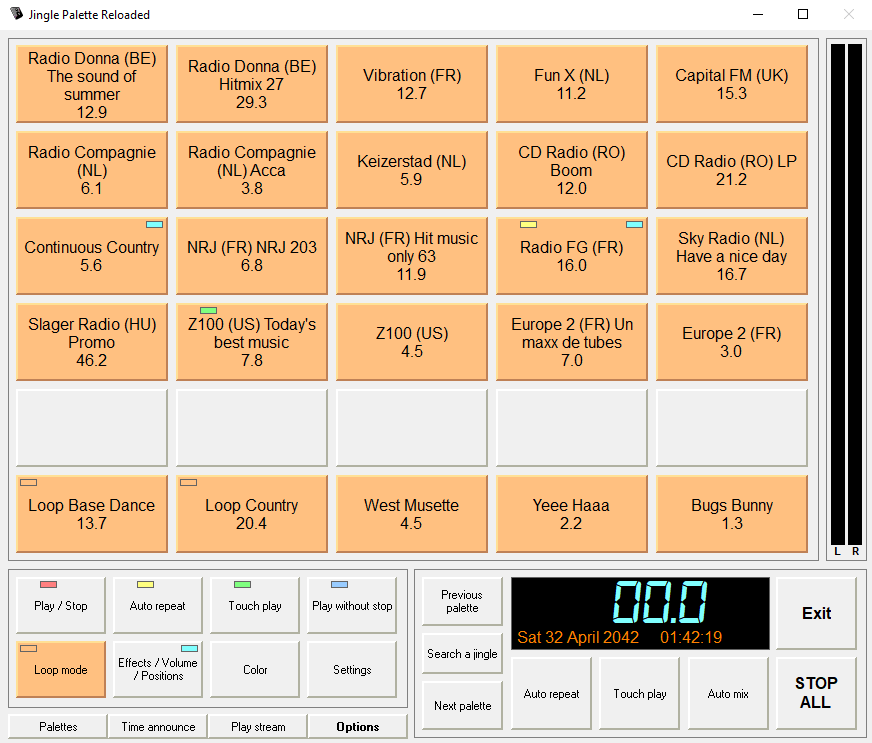
Clicking a jingle will enable its loop playback mode. To remind you about this state, an orange LED is lit up on the button. If you play a jingle while this is on, that jingle will be looped (e.g. repeated) until you stop it in some way, either with STOP ALL, or by clicking it again without the autorepeat mode on.
Note: due to loop function of the audio module, if the jingle has a Start position (refer to Effects section) defined (so not at 0), the jingle will play from the Start position, and will loop from the beginning, not from the Start position.
Note: for best results, it is recommended to store jingles that you wish to loop in PCM WAV, MP1, MP2 or AIF/AIFF format only. We do not recommend MP3 for looping.
Right-clicking on a jingle button and selecting Loop mode will do the same.
Each jingle can be played in sequential mode, and this preference is also memorized in the palette on saving it. To do that, click twice the Loop / Sequential mode button. The button will change for Sequential mode and all the assigned buttons on the palette will turn turquoise, allowing you to select a jingle to be played in sequential mode:
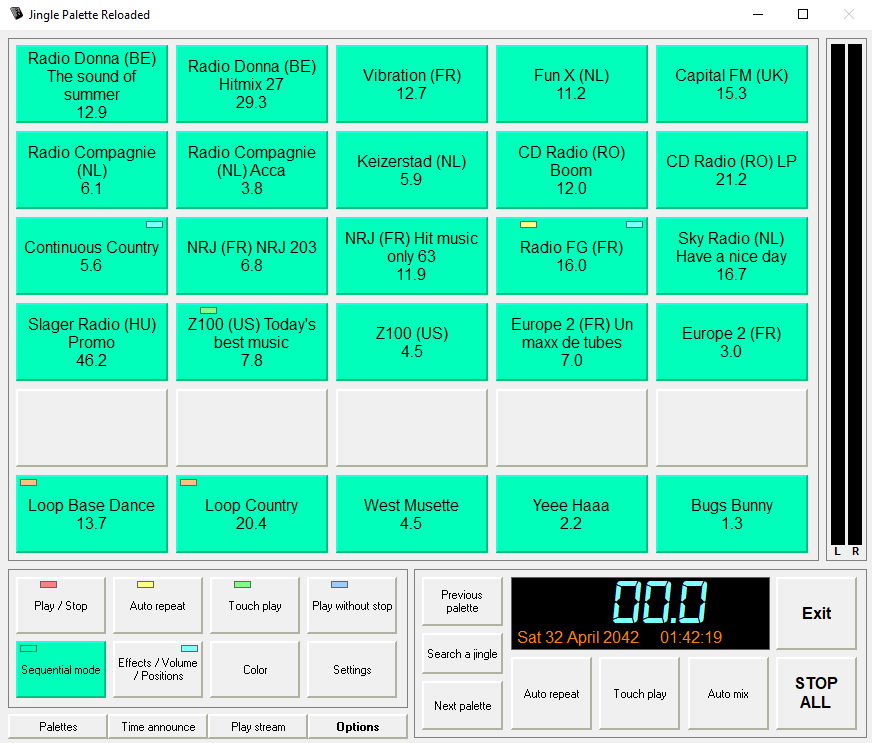
Clicking a jingle will enable its sequential playback mode. To remind you about this state, a turquoise LED is lit up on the button.
The sequential mode allows you to play a jingle or track in several steps. You can set a loop of a part of a track, exit from loop, stop the playback with linear or logarithmic fade out. This is useful for example, to make the begin of a track looping while the radio animator is talking, and once he finished to talk, exiting loop and let continue playing the rest of the track.
Right-clicking on a jingle button and selecting Sequential mode will do the same.
The sequential mode settings are in the effects window.
You can set effects individually, for each jingle. These settings are memorized in the palette when save it.
To set the effects for each jingle, click Effects / Volume / Positions button. All the assigned buttons on the palette will turn blue, so you can choose a jingle to set its effects.
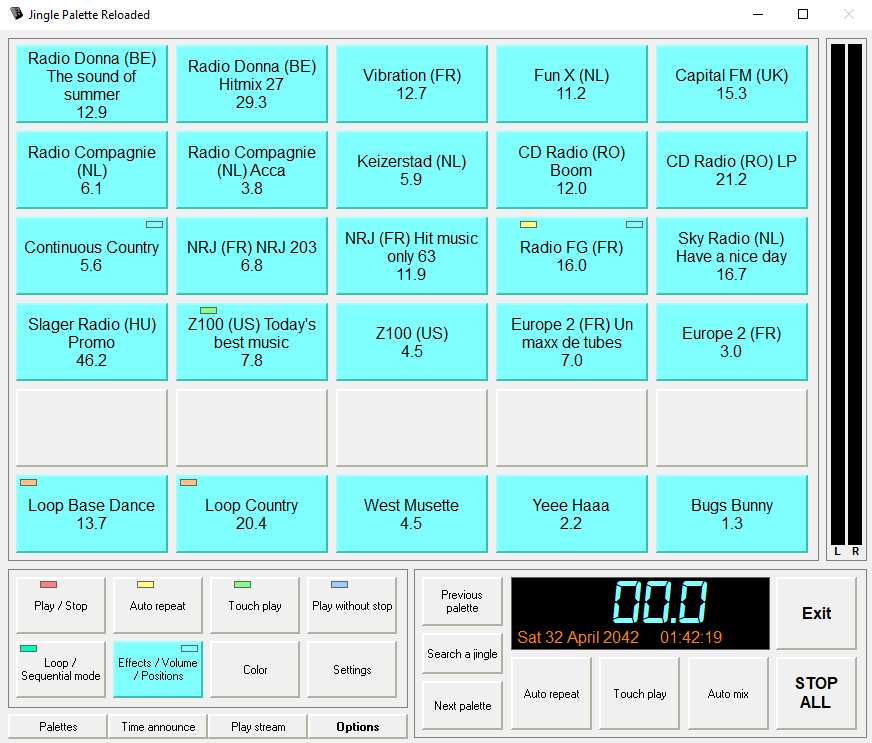
After clicking the desired jingle button, the effects window will appear with 2 tabs (right-clicking on a jingle button and selecting Effects, volume, positions will bring up the same thing).
For both tabs, you can play the jingle directly from the effects windows. A cursor allows you to move the playback position through the jingle or track, and the playback position is displayed at the right.
Effects tab:
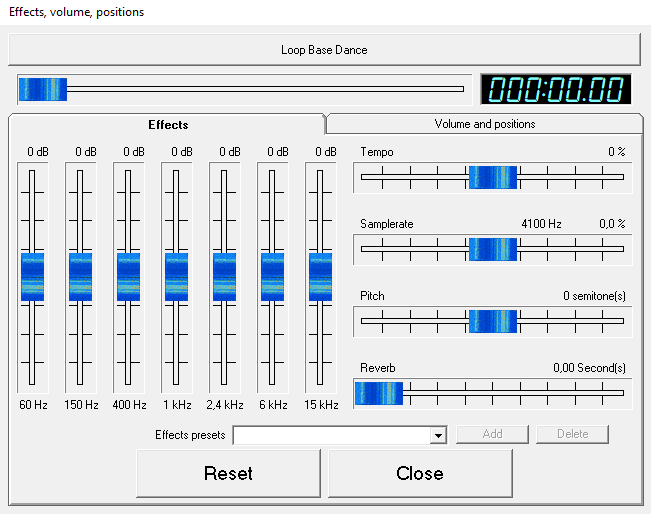
This tab allowing you to precisely set the 7 bands equalizer, tempo, samplerate, pitch ans reverb by dragging the matching cursors.
Effects presets: you can save and call back effects presets. To add a preset, enter a preset name of your choice and click on Add button: your preset will appear in the dropdown list of presets. If the preset already exists before adding it, you will have to confirm the preset replacement to save the new effects settings. Each time you select a preset, it will call back the effects settings. It is useful if you want to apply the same effects to several jingles. To delete a preset, simply select it and click on Delete button (and confirm).
Note about effects properties: you can change the equalizer bands frequencies and level range, the tempo/samplerate %/pitch range by editing the keys EQBands, EQVMax and TempoMax in jp.ini file. However, initial values are designed to give a good balance between effects rendering and settings precision. We recommend to not change them.
Volume and positions options tab:

This tab allowing you to set the jingle volume.
Auto-ducking: if checked, the volume of this jingle will fade out when another jingle plays. By default, it is checked for audio files over than 2 minutes (like songs).
Does not trigger Auto-ducking: if checked, this jingle will not trigger the auto-ducking when it will play. this setting is unchecked by default.
You can increase volume from original level, by changing the range. For example, you have a jingle recorded with half available audio amplitude, set the range to 200% and you will able to double the jingle level without having to edit the file.
Don't hesitate to use the VU-meters to adjust the good level for the jingle.
Also, you can use the Max (value) button to set the best volume and get the louder sound without clipping. The value is calculated by detecting the peak level of the jingle.
If you increase the volume over the Max button value, the button will turn red to warn you about possible clippings.
Start position: this setting define the position from where the jingle will play. It is useful if you have a blank at the beginning of the jingle audio file, or if you simply want to play from another position in the jingle.
You can move the slider through the jingle duration or manually enter a time
value.
Note: as well as Jingle Palette need a minimum amount of data to play, you can not set a start position over that 0.3 second before the end of the jingle.
Fade out duration (on manual stop): this setting define the duration while the volume will fade out on manual stop. You can choose between linear or logarithmic fade out curve.
The next settings are reserved for sequential mode:
Loop In position: sets the beginning of the loop. The Copy Start position button sets the begin of the loop to the start position of the jingle.
Loop Out position: sets the end of the loop.
During the playback, when its position reaches the loop out position, it returns to the loop in position.
Note: the loop out position can not be set before the loop in position: if you move one or other, the other will move to never have the loop in position after the loop out position.
You can set the position with arrows of the minutes, seconds, centiseconds boxes.
You can test loop in position with the "play icon" button. You can test the loop out position with the "return icon" button: it will restart the playback 1 second before the loop out position, to test the loop fitting, and set a perfect loop.
Lock loop length: links the loop in position and loop out position cursors, so when you move one, it moves the other, and the loop still has the samed length. This is useful if, for example, you make a loop of 4 beats, and you want to loop elsewhere in the track, but always with a 4 beats length.
Sequential mode steps:
- First click on the jingle button: begins the playback from start position. When the loop in position has been overstepped, the sequential mode LED slowly blinks, indicating the loop is active.
- Second click: before the loop in position or if Continue looping while fade out option is checked (even if playback is already looping), the fade out begins, the sequential mode LED fastly blinks. While looping, if Continue looping while fade out option is unchecked, the loop is disabled, the playback continues, the sequential mode LED does not blink anymore.
- Third click: while fading out, it stops the playback even if the fade out duration has not been reached. While normal playback after loop, the fade out begins, the sequential mode LED fastly blinks.
- Fourth click (if fading out): it stops the playback even if the fade out duration has not been reached.
Note: to reset a cursor position, double-click on it, it will come back to default value. The Reset button brings all settings to default for the active tab.
A floppy disk icon appears on the display once you change an effect setting, bring you up to save the palette if you want to keep changes.
If any effect setting is different of default value, a blue LED appears on the jingle button.
After setting the desired effects and/or volume and positions options, click on Close to return to the main window.
As previous options, you can assign a button color to a jingle. Click on Color and click the button you want to assign a color, and pick a color:

Clicking the Settings button or pressing F2 on your keyboard will bring you up the Configuration settings window, which will allow you to choose different options for Jingle Palette:
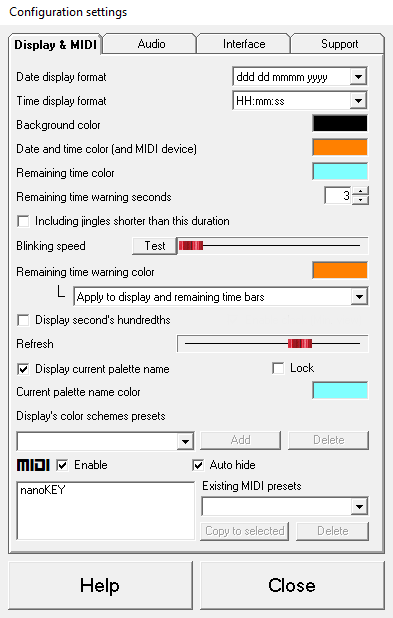
Here you can choose the Time and Date display format, the number of seconds after which the remaining time change color, including
or not jingles under this duration, blinking, displaying or not the second's
hundredths, the current palette name, and different colors on the display. You can set the refresh rate of the display: to the left, slower, to the right,
faster. This is useful to reduce CPU usage on slow machine, by dragging the
cursor to the left. Double click on the cursor will recall to the default value.
You can push to the right but honestly, you won't probably see the difference,
perhaps excepted with second's hundredths displayed, and it could result to
higher CPU usage. We recommend to keep the default value. This setting also
acts on jingles buttons colors updates.
You can add, recall or delete presets of color schemes. To recall a color to its default value, right-click on the color you want to reset.
You can Enable MIDI to use a controller. The list of available controllers is displayed below. The Auto hide option allows to hide MIDI controller informations from the display if no controller is connected.
Note: if the usually selected controller is not available (not plugged to the computer), Jingle Palette will take the first available one. If you plug back the selected controller, it will take the priority and be used in place of the other. You don't need to restart Jingle Palette to switch from a device to another. If your have several MIDI controllers, each one keep its learnings, once they keep the same name. If a same controller has a different name when you plug it into another USB port, the previous learning won't be used, you'd have to learn again or copy an existing MIDI preset (choose the MIDI controller in the left list, choose the MIDI preset in the dropdown list and click on the Copy to selected button). To delete a MIDI preset, simple select it in the drowpdown list and click on Delete button. If you want to clear the actual MIDI controller learning, just select it, and then, click onto it with the right button of your mouse. A confirmation box will appear.
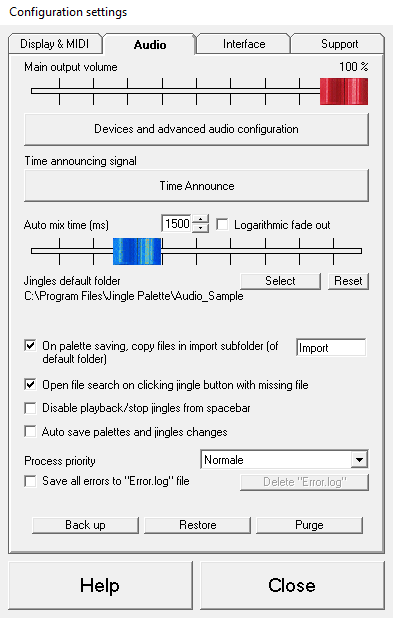
The red fader allows you to set the main output volume level from Jingle Palette. To reset to 100%, you can double-click on the fader.
Device and advanced audio configuration: this opens another window where you can setup audio devices and Auto-Ducking parameters:
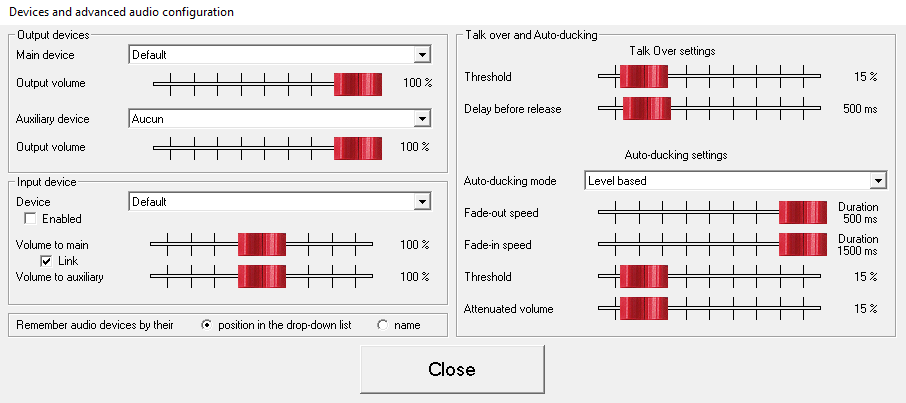
Output devices: you can choose here, two output devices and set their volume. It is especially useful if you want to broadcast: install a Virtual Cable software from your choice and restart Jingle Palette. You would see the new Virtual Cable in the devices list, choose it as auxiliary device, and the Jingle Palette output will be sent to this Virtual Cable. To the other side of your Virtual Cable, use a broadcast software like BUTT (Broadcast Using This Tool), or other from your choice, to send your show to a web radio service.
Input device: you can choose here, an input device. If you would make some web radio shows (like described above), select the input device and enable it. Two new buttons will appear at the left of "Previous/Next palette buttons":
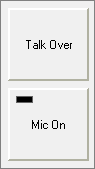
Talk Over: like on DJ mixers, if enabled, when the audio input level exceed the Threshold level, it will activate the Mic On button. When the input level returns under the Threshold level, the Mic On button will deactivate.
Mic On: this is a momentary button. When pressed, it will turn on the input and it will play to the outputs. The other playing sources (songs, jingles, stream...) will fade out. When released, the audio input won't play no more to the outputs, and the other sources volume will come back to normal. The LED lights up when the input level is over 95%.
You can (in Devices and advanced audio configuration) set the input volume for each output. It could be useful because of sound card latency, making playing the audio input, to the outputs, with a small latency, that could be disturbing if you listen yourself in your headphones (in this case, uncheck Link and decrease the input volume to main - it your headphones is plugged on the Main output).
Talk Over settings:
Threshold: this sets the Talk Over sensitivity. Near from 0%, the Talk Over activate the Mic On button near from always, since there is small background noise it your studio. Near from 100%, you will have to speak very loud in your microphone to activate the Mic On button. The default value should be a good setting.
Delay before release: this sets the time before deactivate Mic On button once the input level is under the Threshold.
Auto-Ducking settings:
Auto-Ducking mode: you can choose to Auto-Duck based on level or playback.
Fade-out speed: this sets the time to fade out the other sources to Attenuated volume.
Fade-in speed: this sets the time to fade in the other sources to their norma volume.
Threshold: this acts like Talk Over threshold, but for jingles that trigger auto-ducking, instead of the input device.
In playback based mode, Fade-in advance replaces Threshold. It sets the time to apply fade-in before the end of jingle playback (so the other sources starting to restore their normal volume before the end of jingle).
Attenuated volume: this set the volume when Auto-Ducking is enabled.
Remember devices by their position/name: this is the method for initializing your sound cards. By position in the devices list, if you add another sound card to your computer, it could result to initialize the wrong sound card on the next Jingle Palette startup. By name, the position in the list doesn't matter, but if you have two or more soundcards with the exactly same name, the first of identical will be selected.
Back to Settings, the Time announce signal can be chosen here in a similar way that jingle assignment is done.
The Auto mix time can be set in milliseconds. The default is 1500 (1.5 seconds) but you can specify any value between 1 and 5000. To reset to default value, you can double-click on the fader.
You can choose to apply a logarithmic or linear fade out curve.
You can select the default folder for new jingles (already assigned buttons won't have their jingle path changed). The default audio files folder of Jingle Palette is Audio_Sample in the software installation folder. Clicking on Reset button will restore the default folder.
If a jingle file assigned to a button is outside from the default folder, it will be automatically copied to the subfolder Import of the default folder on palette saving, if this next option is checked. You can change the name of this subfolder. If you leave the subfolder name field empty, the jingles will be copied in the default folder.
Next, if a jingle file has been moved, renamed or deleted, Jingle Palette will warn you about missing file with jingle name in red on its button. A right click on the button allow you to search the file. This option makes opening search function directly on clicking on jingle button with missing file.
Disable playback/stop from spacebar checked, the keybard's spacebar still pushing buttons but jingles won't play or stop anymore.
You can choose to Jingle Palette save automatically each time you apply any change (add/remove/copy/move jingles, change effects, play mode...), by checking Auto save palettes and jingles changes. It act like if you manually click on the floppy icon each time it appears.
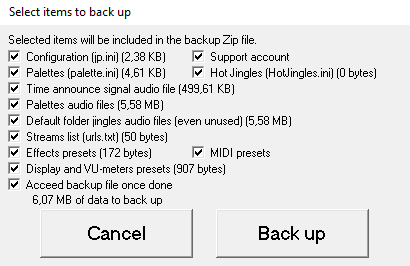
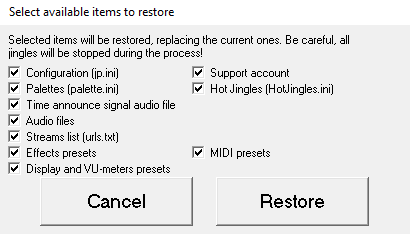
The next buttons allow to backup and restore Jingle Palette configuration.
The Purge allows to delete from jingles default folder, files that are not used in palettes neither Time announce signal. This action is definitive since the confirmation request has been validated.
Note: empty subfolders after purge are deleted too.
The Process priority can be chosen here from Low to High. This is useful in case you want to fine tune the software compatibility between programs running together on the same computer system.
Save all errors to "Error.log" file checked saves open/close program, audio module, etc., errors to a logfile to check later. You can clear the log file with the button following this option.
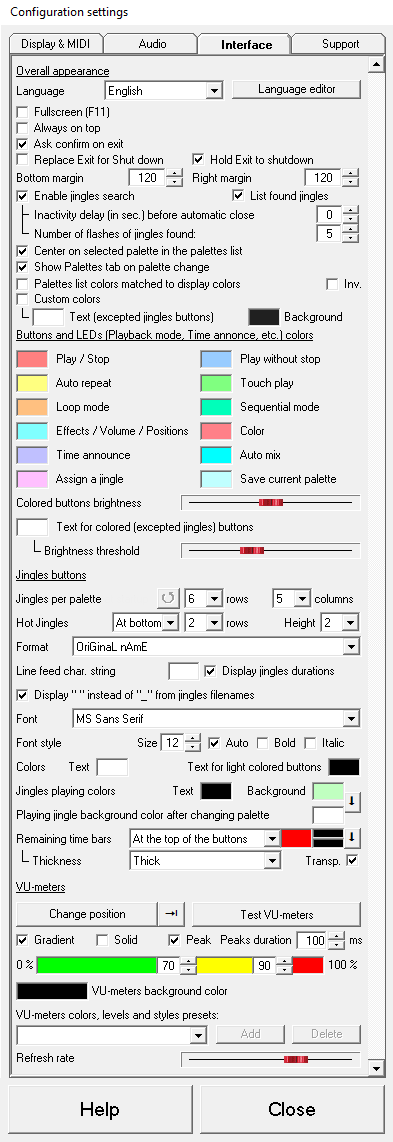
Changing the language of the interface can be done easily, by selecting the desired language from the Language dropdown box. To have Jingle Palette translated in your language, see Translating Jingle Palette in your own language section. It's easy and anyone can do it.
Fullscreen checked makes Jingle Palette displayed on all the screen size, without application title bar, over Windows taskbar and other softwares.
Minimalist view checked makes the bottom of Jingle Palette displayed with a light design.
Always on top checked makes Jingle Palette to be the topmost window on your desktop. That's helpful when using with other broadcasting tools.
Ask confirm on exit checked makes Jingle Palette checked prevents accidentally stop playing jingles.
Replace Exit for shutdown checked allows to turn off the computer (Windows shut down) directly on Jingle Palette exiting.
Hold Exit to Shut down checked allows to turn off the computer (Windows shut down) directly by holding Exit button pressed.
Bottom and Right margins allows you to set these margins to get a optimal Jingle Palette displaying.
Check Display jingle search button to make it visible between Previous palette and Next palette buttons. About the folloing value, if set to 0, the search window won't close automatically.
Center on selected palette in the palettes list checked makes the highlighted palette centered in the list when possible.
Show Palettes tab on palette change checked makes Jingle Palette bring back Palettes tab when you change palette.
Palettes list colors matched to display colors checked makes Jingle Palette changing palettes list and input palette name (when saving) colors to match with the background and palette names of the display. Note: it does not affect the selected palette in the list, as well as colors are OS related.
Inv. checked makes background and text colors inverted in the palettes list and input palette name (when saving/renaming it).
Custom colors checked allows you to choose text and background colors for the main window. The two color cases allows you to set the text color for all buttons excepted jingles, and the background color for the whole main interface. For example, here is the rendering with preset custom colors:
Buttons and LEDs (Playback modes, Time announce, etc.) colors allows you to choose the color for matching features.
Colored buttons brightness allow you to change the colored button brightness, which is useful if you would use Jingle Palette with dark colors, in a dark studio. This setting also acts on colored jingle buttons.
The color case under this setting allows you to set the text color for colored buttons, excepted for jingles buttons, when their background color is too dark. You can set the brightness threshold for this color switching.
Jingles per palette allows you to choose amount of columns and rows of jingles per palette, up to 96. The button with the turning arrow recalls the original values of rows/columns.
Hot Jingles allows you to choose one or two rows of buttons that not change with palettes, and their position and size.
Jingle label format allows you to choose the case of jingle label buttons.
Line feed char. string is useful to voluntary creates a carriage return in the jingle name each times its filename contains this string. The carriage return replaces the string. For example, if the string is " - ", and the jingle filaname is "My radio - Intro jingle.mp3", the jingle will be displayed like this:
My radio
Intro jingle
Display jingles duration checked makes Jingle Palette displaying each jingles duration. The duration format match with remaining time format of the display (minutes on 3 digits if needed, seconds and tenths). Note that you can customize the duration displaying format directly in the jp.ini file, by editing the JDispDurationEncap key. The "duration" word in the value is required. If you want, for example, brackets around the duration, edit the JDispDurationEncap key value for [duration] .
Display " " instead of "_" from jingles filename checked makes Jingle Palette replace each "_" (underscore) for a space.
Font, Font style, Size, Auto (size), Bold and Italic allows you to customize the style of jingle buttons text. Listed fonts are these installed on Windows. If the selected font has been removed from Windows, the "MS Sans Serif" font will be used as substitute. Note that Jingle Palette startup time could be related to the number of installed font to list.
The two next color cases allows you to set the text color for jingle buttons. Their usage is also related with brightness threshold.
Jingle playing colors allows you to choose text and background colors for the playing jingles. Click on the button with down arrow to copy the background color of playing jingles to these of jingles still playing while changing palette.
Remaining time bars allows you to show/hide and customize the remaining time bar of each playing jingle. The color at right is the color of the bar, and both after, are their background colors (first for actual palette, second for jingles still playing while changing palette, click the arrow to copy the first to the second).
VU-meters allows you to customize the Jingle Palette's VU-meters. You can change their location around the palette area (default right, bottom, left, top), but also send them miniaturized in the right side of the display, or simply hide them if they are useless for you. Note that in the display location, the Peak option is disabled. You can change their style and middle(yellow)/high(red) levels. You can also customize the low, middle, high levels and background colors by clicking onto them. Right-clicking on a color resets it to its default value. Check the Test VU-meters button to force level displaying 100%.
Refresh rate allows you to set the amount of measures per second. To left, less, the VU-meters will appears as slow, this is useful to reduce CPU usage on slow computers. To the right, VU-meters appears as fast, but it could increase the CPU usage. We recommend the default value.
Note: values with little Up/Down arrows can be changed from keyboard by pressing UP, DOWN keys in the corresponding number input box. Pressing LEFT or RIGHT will change the values more rapidly.
Note: to reset a value to default, remember you can double click (or right-click for color cases) on the setting.
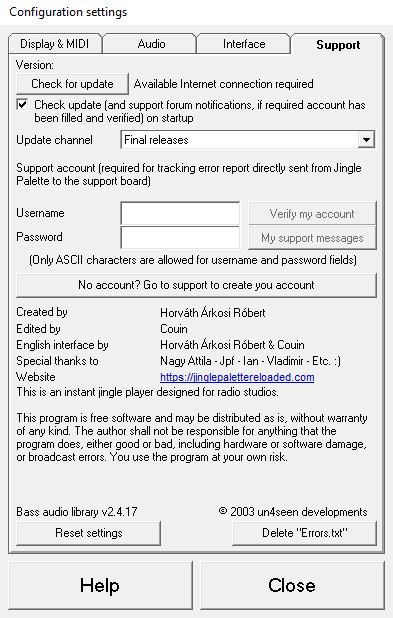
The next section allows you to link Jingle Palette to your Support board account (an available Internet connection is required): in case of software error, you can report it directly without having to open a thread on the support board. Jingle Palette will do it for you and will purpose you to browse the created thread. This new thread will be added to your subscribed threads.
If you have Check update at startup option checked, and if you have a Support board notification (like answers to subscribed threads, private messages), a bell will appear on the display. If you click on it, Jingle Palette will open your default web browser and take you to your support board notifications page (perhaps with login required).
Just enter your username and password (only ASCII characters are accepted here), you can Verify your account to be sure of credential validation. Don't forget that if you change your password on support board, you will have to change it here too.
You can also browse your support message by clicking on My support messages.
If you have no account, you can create one simply by clicking on the button No account? Go to support to create your account.
Note: error reporting is important for us. Please, try to be precise in the description of how you got it. This is the only way to try to fix errors. If you have no account when an error happens, you can create and fill credential fields while the error report window is opened, or you can send report as anonymous, but in this case, the report will be hidden on the support board, until a moderator estimate to makes it as visible, and you won't receive any notification, excepted if you create an account and subscribe to the anonymous thread.
Clicking on Reset settings will call back Jingle Palette settings to default values, expected palettes (your palettes won't be deleted).
Clicking on Delete "Errors.txt" will delete the errors history file.